Google’s DoubleClick for Publishers is a comprehensive hosted ad serving platform that streamlines your ad management functions and allows you to generate even-greater advertising margins. It offers publishers a complete ad revenue engine, helping publishers streamline operations and capture the most value for every impression.
Google DFP (Community) Connector 3.1.1
The Anypoint Connector for Google DFP enables publishers and third-parties to consume the Google DFP API to help them grow, sell, schedule, deliver, and measure their digital ad inventory on Google DFP through Mule.
The connector has a Community and Premium version, the Community connector is free and open source, whilst the Premium connector is a paid-for and closed source version which contains extra functionality.
The Anypoint Connector for Google DFP allows one to easily build Mule applications to consume the following services of the Google DFP API: Company, Contact, Inventory, Line Item, Order, User, Report, Custom Field (Premium Only), Custom Targeting (Premium Only), Forecast (Premium Only), Placement (Premium Only), PQL (Premium Only).
MuleSoft maintains the Premium connector under the Certified support policy. The documentation for the Premium version of the connector can be found here.
Prerequisites
This document assumes that you are familiar with Mule, Anypoint Connectors, and Anypoint Studio. To increase your familiarity with Studio, consider completing a Anypoint Studio Tutorial. This page requires some basic knowledge of Mule Concepts, Elements in a Mule Flow, and Global Elements.
To use this connector, you will also need an account on the Google DFP website. Click on this link to obtain a Google DFP account and the necessary authentication credentials (OAuth/Service Acccount).
You will also require Anypoint Studio downloaded and installed on your development machine.
Hardware and Software Requirements
For hardware and software requirements, please visit the Hardware and Software Requirements page.
Compatibility
| Software | Version |
|---|---|
Mule Runtime |
EE 3.6.x+ |
Java |
7+ |
Google DFP |
v201711 |
How to Install
You can install the connector in Anypoint Studio using the instructions in Installing a Connector from Anypoint Exchange.
How to Configure
To use the Google DFP Community connector in your Mule application, you must configure a global Google DFP Community element that can be used by the Google DFP Community connector (read more about Global Elements). The Google DFP Community connector offers the following two global configurations described below.
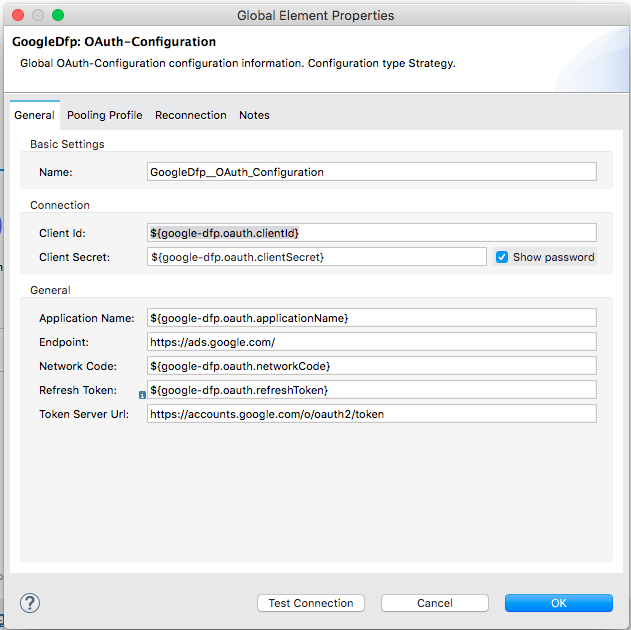
1. OAuth Authentication
-
Click the Global Elements tab at the base of the canvas, then click Create.
-
In the Choose Global Type menu, use the filter to locate and select GoogleDfp:OAuth-Configuration, then click OK.
-
Configure the parameters according to the table below.
Parameter Description Name
Name for the configuration so it can be referenced later.
Client Id
Client ID for your Google DFP application created in the API console.
Client Secret
Corresponding client secret.
Application Name
Name of your application chosen in the API console.
Endpoint
DFP API end point server (Optional).
Network Code
Header networkCode associated with your application created in the API console.
Refresh Token
Refresh token.
Token Server URL
DFP API token server URL (Optional).
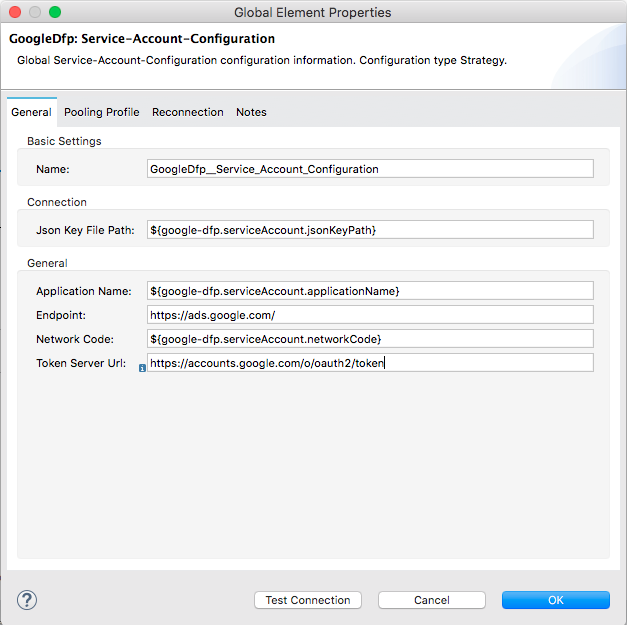
2. Service Account Authentication
-
Click the Global Elements tab at the base of the canvas, then click Create.
-
In the Choose Global Type menu, use the filter to locate and select GoogleDfp: Service-Account-Configuration, then click OK.
-
Configure the parameters according to the table below.
Parameter Description Name
Name for the configuration so it can be referenced later.
Json Key File Path
File path for your Google DFP application Json Key.
Application Name
Name of your application chosen in the Google DFP API console.
Endpoint
Google DFP API end point server (Optional).
Network Code
Header networkCode associated with your application created in the API console.
Token Server URL
Google DFP API token server URL (Optional).
Required Connector Namespace and Schema
When designing your application in Studio, the act of dragging the connector from the palette onto the Anypoint Studio canvas should automatically populate the XML code with the connector namespace and schema location.
|
Tip
|
If you are manually coding the Mule application in Studio’s XML editor or other text editor, define the namespace and schema location in the header of your Configuration XML, inside the <mule> tag.
|
<mule xmlns="http://www.mulesoft.org/schema/mule/core"
      xmlns:xsi="http://www.w3.org/2001/XMLSchema-instance"
      xmlns:google-dfp="http://www.mulesoft.org/schema/mule/google-dfp"
      xsi:schemaLocation="
               http://www.mulesoft.org/schema/mule/core
               http://www.mulesoft.org/schema/mule/core/current/mule.xsd
               http://www.mulesoft.org/schema/mule/google-dfp
               http://www.mulesoft.org/schema/mule/google-dfp/current/mule-google-dfp.xsd">

      <!-- put your global configuration elements and flows here -->

</mule>
Maven Dependency Information
If Maven is backing the application, this XML snippet must be included in your pom.xml file.
<dependency>
  <groupId>org.mule.modules</groupId>
  <artifactId>google-dfp-connector-community</artifactId>
  <version>3.1.1</version>
</dependency>
Common Use Cases
Create Company
The following walkthrough describes a simple procedure to use the connector and create a company on Google DFP.

-
Drag an HTTP Endpoint into a new flow. Configure a new HTTP Listener Configuration on Port 8081. In the properties view of the HTTP Endpoint configure the HTTP endpoint as follows:
Field
Value
Display Name
HTTP (or any other name you prefer)
Exchange Pattern
request-response
Path
/createCompany
Port
8081
Method
POST
-
Add a Dataweave transformer after HTTP endpoint to create a new Google Company to pass on to the connector. Do the mapping from a JSON object to a Google Company object to assign the values.

Since internally the Google DFP library uses classes to represent Enum a global MEL function should be defined in the Mule Configuration XML as shown below:
<configuration doc:name="Configuration"> <expression-language> <global-functions> def stringToCompanyType(enumString){ return com.google.api.ads.dfp.axis.v201711.CompanyType.fromString(enumString.toUpperCase()) } </global-functions> </expression-language> </configuration> -
Drag a GoogleDfp connector endpoint into the same flow. Select it to open the properties editor console. Next to Connector Configuration click the
+sign to add a new connection configuration and add your credentials. Set the rest of the properties as follows:
-
Add another Dataweave transformer after the Google DFP endpoint to map an object of
List<Long>returned by the Google DFP to JSON and extract the new company ID. -
Save the project and then run it as a Mule Application (right-click project name, then select Run As > Mule Application).
-
Make a POST request to: http://localhost:8081/createCompany with a suitable body:
{ "Companies": [ { "companyName": "demoCompany", "companyAddress": "12, John Doe Street, Birkirkara BKR1234", "companyEmail": "hello@democompany.com", "companyType": "Agency" } ] } -
The Mule application will perform the operation and add the Company record to GoogleDfp. An ID should be returned in JSON format.
Get a Company
The following walkthrough describes a simple procedure to use the connector and retrieve a company record from Google DFP.

-
Drag an HTTP Endpoint into a new flow. Configure a new HTTP Listener Configuration on Port 8081. In the properties view of the HTTP Endpoint configure the HTTP endpoint as follows:
Field
Value
Display Name
HTTP (or any other name you prefer)
Exchange Pattern
request-response
Path
/getCompany/{companyId}
Port
8081
Method
GET
-
Drag a GoogleDfp connector endpoint into the same flow. Select it to open the properties editor console. Next to Connector Configuration click the
+sign to add a new connection configuration and add your credentials. Set the rest of the properties as follows:
-
In the Query Params field, select Create Object manually. Click the button
…and in the popup window that opens select the+sign to create a new object. Configure the new object as follows:
-
Add an Object to JSON transformer after the Google DFP connector endpoint.
-
Save the project and then run it as a Mule Application (right-click project name, then select Run As > Mule Application).
-
Make a GET request to: http://localhost:8081/getCompany/1234. Here 1234 refers to the ID of the company you are trying to retrieve.
-
The Mule application will perform the operation and return JSON data containing information about the company requested.
Update a Company
The following walkthrough describes a simple procedure to use the connector to update a Company record on Google DFP.

-
Drag an HTTP Endpoint into a new flow. Configure a new HTTP Listener Configuration on Port 8081. In the properties view of the HTTP Endpoint configure the HTTP endpoint as follows:
Field
Value
Display Name
HTTP (or any other name you prefer)
Exchange Pattern
request-response
Path
/updateCompany
Port
8081
Method
PUT
-
Add a Dataweave transformer after HTTP endpoint to create a new Google Company to pass on to the connector. Do the mapping from a JSON object to a Google Company object to assign the values.

-
Drag a GoogleDfp connector endpoint into the same flow. Select it to open the properties editor console. Next to Connector Configuration click the
+sign to add a new connection configuration and add your credentials. Set the rest of the properties as follows:
-
Add an Object to JSON transformer after the Google DFP connector endpoint to transform the Google Company object into JSON data.
-
Save the project and then run it as a Mule Application (right-click project name, then select Run As > Mule Application).
-
Make a PUT request to: http://localhost:8081/updateCompany with a suitable body:
{ "Companies": [ { "companyId": "12345", "companyEmail" : "updatedcompanyemail@mycompany.com", "companyName": "updatedCompany", "companyAddress": "60, John Doe Street, Birkirkara BKR1234" } ] } -
The Mule application will perform the operation and return the ID of the update company record.
Resources
-
Visit the DFP (Community) Release Notes page for the release notes of the connector.
-
Visit the DFP (Community) Connector API Reference page for the technical documentation of the connector.
-
Visit DFP API release notes page for information on DFP v201711 API.
-
Learn how to Install and Configure Anypoint™ Connectors in Anypoint™ Studio here.
-
Access MuleSoft’s forum to pose questions and get help from Mule’s broad community of users.
-
To access MuleSoft’s expert support team, subscribe to Mule ESB Enterprise and log in to MuleSoft’s Customer Portal.
-
Contact the connector developers at Ricston.